resources
Teacher's Resources - Ordering the Universe
Archaeologists and ethnographers study the art and architecture of ancient civilizations in order to understand the symbol systems of the cultures that made them. A written language, once decoded, helps to form this understanding.
Of the five written languages in ancient Mesoamerica ( Maya, Mixtec, Zapotec, Epi-Olmec, Aztec) Classic Maya writing was the most complete; it was capable of recording anything that could be spoken. Maya hieroglyphs are represented on many CLOTH & CLAY ceramic objects.
There was no system of writing in the ancient civilizations of the Andes. While they may not have possessed a system of writing, the people of the Andes did develop a sophisticated system for communicating and storing numerical information.
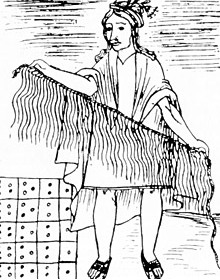
The ancient Andean system we are aware of is that of the Inka: the quipu (depicted in the image above by 17th century chronicler Guaman Poma). It is not known if a similar system, perhaps using carved or painted beans, may have predated the Inka quipu, but it is likely that other large-scale pre-Inka states had their own forms of recording and communicating similar data.
The quipu is an assemblage of coloured, knotted cords. Complex information regarding taxes, state revenues and expenses were recorded on quipus. Census figures were also collected and stored on quipus. The quipu is a complex tool that was understood by those that made them. The colours of the cords, their relative placement, the spaces between them as well as how each cord was knotted fit into an established recording system that allowed the Inka to communicate detailed numerical information from one side of their empire to the other.
The Mayan writing system, as well as the Inka quipu, were likely understood only by an educated elite. For the vast majority of ancient Americans human memory, verbal communication and symbolic representation transmitted information and carried meaning.
Classroom Activities and Projects (recommended ages are in italics and are approximate)
1. Grid Designs 8 -11 : The Pliable Grid (grid templates): Using the textile grid as a template, draw an abstract design in the style of the CLOTH & CLAY objects. Draw in pencil first, using the whole grid surface. Then colour it in, square-by-square; a square has to be all one colour.
11 -16: To understand how patterns and images appear on the pliable grid of cloth, start with two identical rectangular grids. Draw an image on one of the grids, colouring it in square-by-square, then set it aside. Redraw the blank grid, altering it by means of perspective or skewing, by hand or in a computer-drawing program. Use the provided templates as examples at first, then create your own. Copy your original drawing onto the altered grid, square-by-square.
Pliable grid concepts can also be applied to ceramic objects, using the ceramic grid, AKA the polar grid. When you are working with ceramic design concepts the design approach is more fluid than with woven textiles, but the grid is still useful in these activities as an aid to measurement. In the case of objects made of modelling media the pliability is temporary. Once the media is dried or fired any distortions are permanent, unlike textiles, which remain pliable.
9 -14: Using the border grid, design a border using geometric designs. This border is to go around the hem of a garment or the edge of a bowl. Therefore, design it so when you join the two ends the design flows seamlessly. This project can also be adapted to the polar grid.
2. 9 -14: Make a quipu: This quipu will be built to record a receipt for goods purchased. A sample is provided, but students can design their own receipts, based on one they bring from home. See below for detailed instructions for this classroom activity.
3. 8 - 11: Make a glyph in the Maya style to represent yourself: students can create their own code to follow in making up a glyph to express their own unique place in the world. The first step is to make a list of distinguishing characteristics and these can include:
-number and gender of siblings
-kind of pets
-favourite foods: pizza, nachos, milkshakes, etc.
Rounded geometric shapes in an assortment of colours can be the agreed upon symbols. The idea is not to replicate the Mayan system, but to learn generally about symbol systems, codes, and pictographic languages by creating and working with a simple one. The Maya numbers can be used to express the student's age. These are represented on some ceramic objects on the CLOTH & CLAY Web site and in several books; see bibliography.
Once the code is built, students can create a "glyph" using their own group of symbols. When these are clustered close together and the edges are rounded they resemble Maya glyphs. As an extension of this 2-D activity, students can use clay, paper clay, Plasticine, or other modelling media to make a relief plaque featuring their name glyph. Alternately they can carve their name glyph into a piece of Styrofoam and use it as a print block.
MAKE A QUIPU:
This quipu will be built to record a receipt for goods purchased. A sample is provided, but students can design their own receipts, based on one they bring from home.
Sample Receipt:
1. Patrcia's Market - #6
2. Registration - #28
3. Chicken - 2.98
4. Toothbrush - 0.80
5. Tax on toothbrush - 0.12
6. Lettuce - 1.29
7. Tomato - 0.40
8. Subtotal of purchases - 5.47
9. Total taxes - 0.12
10. TOTAL - 5.59
11. Payment - 6.00
12. Change Given - 0.12
Select yarn in four colours, e.g. red, yellow, blue and green. Highly twisted #3 crochet cotton is ideal.
b) Cut three 2-metre pieces in dark red. Hold them together and treat them as one cord. Tape one end to a table, or get a friend to hold it. Holding the other end so the cord is taut, start twisting it to the right; your friend twists their end to the left. The cord will start to kink up. Continue twisting until there is a fair bit of kink in the cords, but not so much that the cords become tangled. Fold the cord in half, (hold tight!) have your friend hold both ends, and lightly stroke the doubled, twisted cords along their length. You will notice the twist distributes all along the cord as you stroke it. Tie the ends in an overhand knot to keep the twist. This is the main cord; it is thicker than the other cords. It will have one folded end and one knotted, raw end.
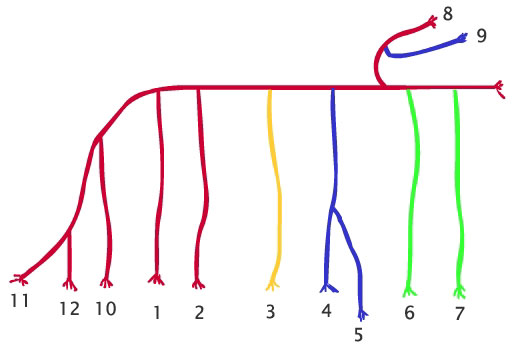
c) Now you can begin to build your quipu. In our example orange stands for meat, blue for grocery items and their taxes, and lime green stands for produce. All other cords are dark red. Cut a 3-metre piece, this time of orange. Fold it in half and tape the raw ends to a table, or get a friend to hold them. Twist it as before, until you fold it in half and tie the ends. This is a pendant cord and it represents the hamburger on the receipt. Pry open the loop at one end of the pendant cord and attach it to the main cord by passing the other, knotted end through the loop. Notice that you hold the loop behind the main cord to pass the end through the loop.
Make 3 blue, 2 green and 6 dark red pendant cords. Attach them to the main cord, using the cash register tape and the drawing as guides. Attach cord #11 to the main cord through its loop; this is a dangle end cord.
d) Different kinds of knots denote the amounts to be recorded, in this instance those of the receipt. Their position on the pendant cord is in clusters, each cluster moving up one power of 10 from the free end to the loop that attaches it to the main cord.
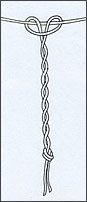
The long knot is used in the units position with the number of turns indicating the digit from 2-9.
![]()
The number 1 in the units position is symbolized by the figure-8 knot, since a long knot cannot be made with fewer than 2 turns.

Single knots are used in all other positions.
![]()
The pendant cord for the receipt item "chicken", therefore, read from the free end, has a long knot with 8 turns = 8, then a space, then a cluster of 9 single knots = 90, then a space, then a cluster of 2 single knots = 200. Make the knots in the other cords to record the various costs.
e) The top cords, 8 and 5, record the total of all the items and the total of the taxes. The dangle end cord records the payment.
f) A zero is recorded as a position on the cord; for the payment of 6.00, the position on the dangle end cord for the units and the 10's is empty and there is a cluster of 6 single knots at the 100's position, lining up with the 100's position on all the pendant cords.